
Access SharePoint Online Data Using Postman Part 1
WebSiteAdmin, February 3, 202216220 Views
In this blog, we will show you how we can interact with SharePoint via Rest APIs and perform actions like adding, updating, deleting, and fetching data using Postman.
We are using two operations SharePoint App Registration and Azure AD app (Graph API).
The important factor is Authentication and Authorization while accessing SharePoint information.
Generate ‘Client-ID’ and ‘Client-Secret’
First, you need SharePoint Authentication by generating ‘Client-ID’ and ‘Client-Secret’. For that refer to “SharePoint Authentication” from the below link:
Connection to Dynamics 365 and SharePoint Authentication Using ClientId & ClientSecret: Part 2
Retrieve the Tenant ID
Now with the App registered, we are ready to access the SharePoint Online information from external system or tools.
We will retrieve the Tenant ID of SharePoint Online tenant using Postman tool.
- Launch the Postman client.
- Select “Get” Method for Request.
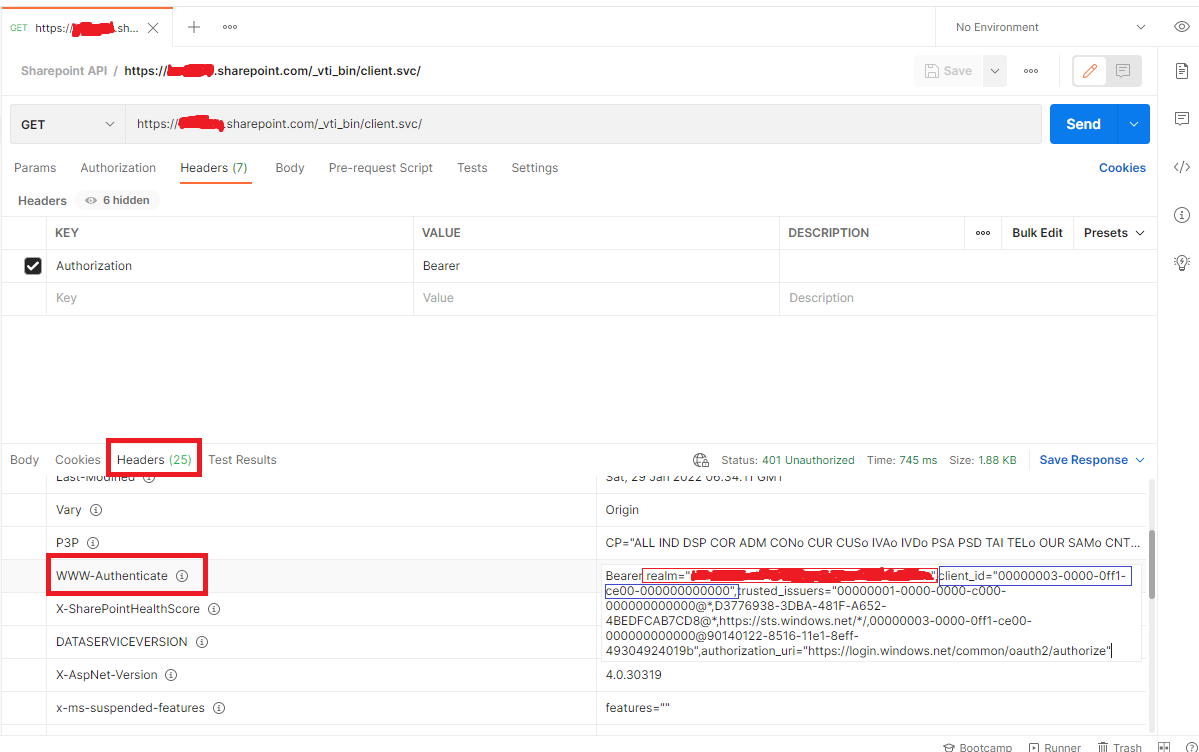
- In the “Request URL” textbox, enter URL in this format. https://[sitename].sharepoint.com/_vti_bin/client.svc/
EXAMPLE: https://testsite.sharepoint.com/_vti_bin/client.svc/
- Navigate to the Header section. Add Key “Authorization” to send with the request and add value “Bearer”.
- Click “Send” to submit the request.

The response will fail with the status message “Unauthorized”. Do not worry we don’t need to fix this. From this, we just need to get “realm” and “client_id” from response header as mentioned below:
- Examine the response Header section (refer to the image below) and look for the “Authenticate” header.
- Note down below 2 values – realm and client_id
- realm = value for the SharePoint Online Tenant Id
- client_id = value for resource information (this value is common always)
-
- Tenant ID = realm value from the previous step (highlighted in above image)
- resource = client_id value from the previous step (highlighted in above image)
Generate the Bearer Access Token
Now we will generate the bearer access token from the Postman tool, which will be used to access the SharePoint information.
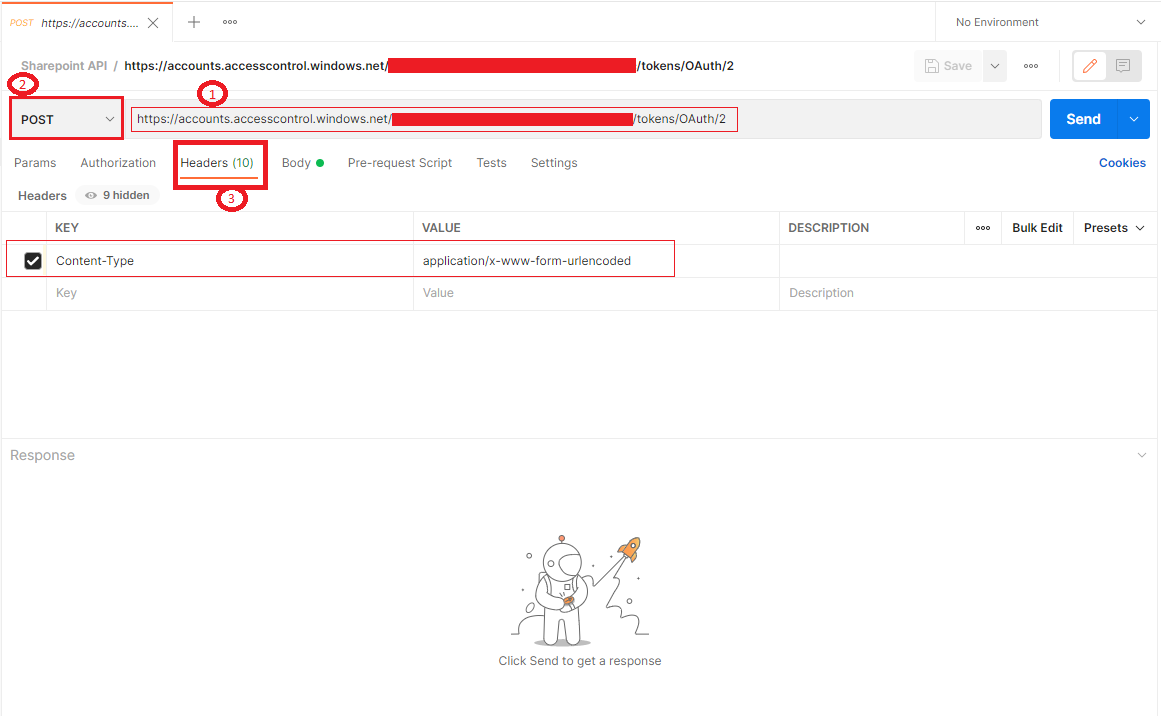
- After getting the “Tenant ID”, we will request the Access Token. To do this, use URL in the below format.
https://accounts.accesscontrol.windows.net/[Tenant ID]/tokens/OAuth/2
- Select the request as POST method.
- Apply Header configuration parameters as below.
- Key = Content-Type
- Value = application/x-www-form-urlencoded
- Apply Body configuration parameters as below.
- grant_type=client_credentials
- client_id=ClientID@TenantID
- client_secret=ClientSecret (generated while App registration)
- resource=resource/SiteDomain@TenantID
- client_credentials = client_credentials (use as it, do not change)
- ClientID@TenantID = Client ID (generated during App registration) @Tenant ID (fetched while retrieving Tenant ID) e.g. 9EDEB6D9-31AC-4354-B89C-5BEE28B33902@4D7317E1-0A2D-4274-E688-187EC0F561F2
- ClientSecret = Client Secret generated while App registration
- resource/SiteDomain@TenantID = 00000003-0000-0ff1-ce00-000000000000/testsite@sharepoint.com@Tenant ID (fetched while retrieving Tenant ID) e.g., 00000003-0000-0ff1-ce00000000000000/testsite@sharepoint.com@4D7317E1-0A2D-4274-E688-187EC0F561F2

- Click “Send” to submit the request.
- Status is now shown as “200 OK” which means the connection to SharePoint online was successful using client id and client secret.
- We can now get the access token from the “Body” section from the result as shown in the below image. Copy the value of “access_token” and note for using the future steps.

Important Note – The access_token is valid only for a few hours (5 to 6 hours usually). So, you need to generate the new token regularly via clicking on the send button
Check the next part below.
Hope this helps!
ATM Inspection PowerApp to ease ATM inspection and report generation process.
https://www.inkeysolutions.com/microsoft-power-platform/power-app/atm-inspection
Insert data into Many-to-Many relationship in Dynamics CRM very easily & quickly, using the Drag and drop listbox.
http://www.inkeysolutions.com/what-we-do/dynamicscrmaddons/drag-and-drop-listbox
Comply your Lead, Contact, and User entities of D365 CRM with GDPR compliance using the GDPR add-on.
https://www.inkeysolutions.com/microsoft-dynamics-365/dynamicscrmaddons/gdpr
Create a personal / system view in Dynamics CRM with all the fields on the form/s which you select for a particular entity using the View Creator.
http://www.inkeysolutions.com/what-we-do/dynamicscrmaddons/view-creator


Your example for resource/SiteDomain@TenantID should contain only one @.
The @ in the SiteDomain definition should go
Hello Ebo,
Thank you for the information.
Admin, thanks a lot!
This page saves me!
Can you help me?
When I try to generate the Bearer Access Token, it returns:
Sign in to your account
What can I do?
Hello Romeu,
Thank you for the question and apologies for the delay. I will get back to you ASAP.
Hello Romeu,
When making API calls to SharePoint via Postman, authentication and session management are critical. You typically need to acquire an access token using your TenantID, ClientID, and Client Secret. Here’s how you can approach this:
1. Initial Sign-In Requirement:
Pre-Process Sign-In: Ensure you are signed in to your SharePoint account before initiating the Postman process. This action establishes a session that may be necessary for accessing certain resources or performing specific operations.
2. Handling the Sign-In Popup:
On-Demand Sign-In: If a sign-in popup appears during the API call process, complete the sign-in within Postman. The popup indicates that the current session is not authenticated or has expired.
Reasons:
Session Management: Signing in to SharePoint creates a session that may expire based on the configured session timeout. Therefore, if the session expires or was not previously established, you will need to re-authenticate.
Access Token Generation: The access token, which is crucial for fetching data from SharePoint, requires a valid sign-in session to be properly issued. Without this, you cannot successfully generate the access token or access the desired content.
Summary:
Before Using Postman:
Ensure you are signed in to SharePoint to establish a valid session.
During Postman Requests:
If prompted, sign in directly through the popup to authenticate and maintain access.
By following these steps, you can ensure that your API calls to SharePoint are successfully authenticated and that you can access the necessary data without interruption.