How to run OOTB Report and send emails with pdf attachments using Power Automate.
Inkey Solutions, December 3, 20241626 Views
These days a speedy-paced business environment and efficient reporting equipment are crucial. Dynamics 365 is a powerful CRM and ERP answer that offers robust reporting capabilities. However, exporting those reports in a consumer-friendly format, like PDF, can on occasion be difficult. Fortunately, Power Automate gives a streamlined way to automate this method. In this blog, we’ll explore a way to install waft that permits you to easily download Dynamics 365 reports as PDFs.
Why Use Power Automate for PDF Exports?
Power Automate (formerly referred to as Microsoft Flow) allows users to create automatic workflows between various applications and offerings. By using Power Automate, you may:
- Save Time: Automate repetitive tasks, lowering guide attempt.
- Enhance Accuracy: Minimize the chance of human errors in file generation.
- Improve Accessibility: Make reports easily shareable throughout your business enterprise.
Step-by-Step Guide to Creating the Flow
Step 1: Set Up Your Environment
Before you start, ensure you have the necessary permissions in Dynamics 365 and access to Power Automate. You’ll need a valid Dynamics 365 account and the reports you want to export.
Step 2: Create a New Flow
- Log in to Power Automate.
- Click on “Create” and select “Automated cloud flow.”
- Choose a trigger for your flow. This could be a specific event in Dynamics 365 or a scheduled time.
– Trigger: we have used manually triggered flow
![]()
Step 3: Add Dynamics 365 Action
- After setting your trigger, add a new action.
- Search for and select the “Dataverse” connector.
- Choose the appropriate action to retrieve your report data (Action: “List Rows”).
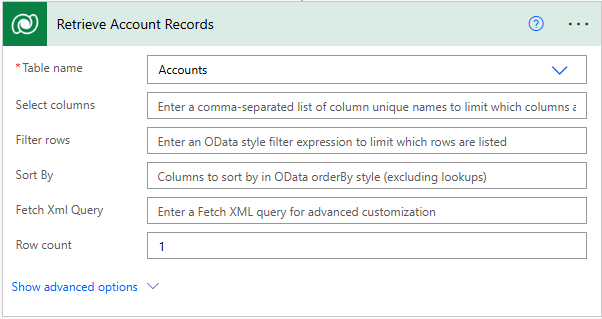
– Filter the rows based on specified criteria, and the list will return the corresponding output.
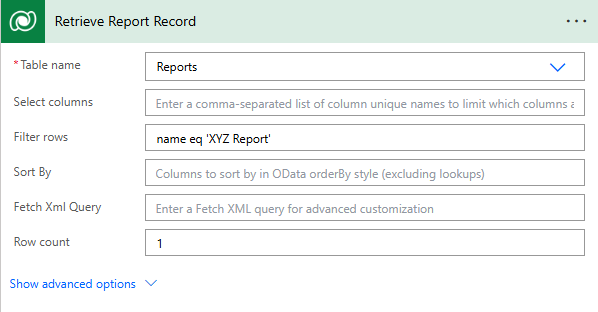
– For example: In the image above, if the name equals ‘XYZ Report,’ the output will return to the record where the name is ‘XYZ Report.’
Step 4: Setup the Report Viewer
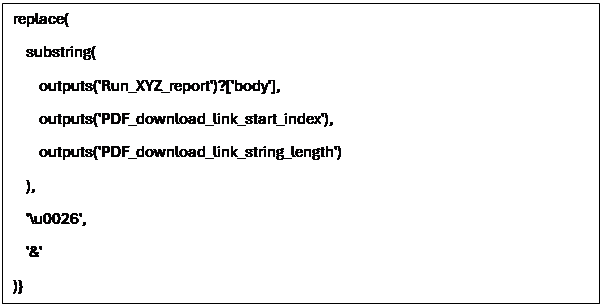
- CRM Filter: This FetchXML query targets the Accounts table in Dynamics 365 CRM. It retrieves all account records where the accountid matches a specific account ID (passed dynamically as Account). The query fetches all attributes of the account, and the results can be used for further processing.
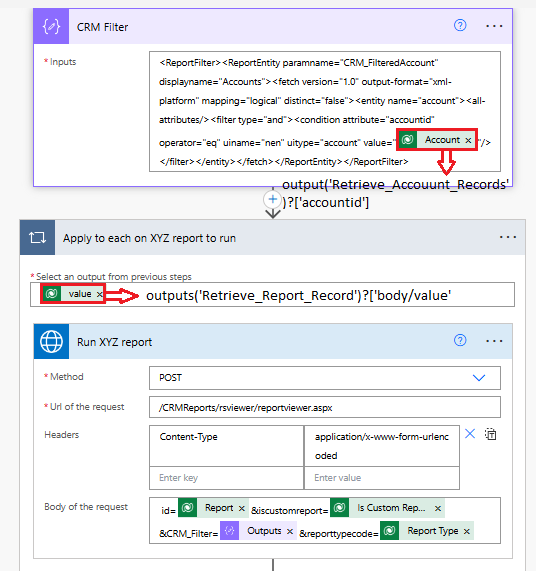
Method: POST
URL of the request: /CRMReports/rsviewer/reportviewer.aspx
Headers: Content-Type: application/x-www-form-urlencoded
Body of the request: id= items(‘Apply_to_each_on_XYZ_report_to_run’)? [‘reportidunique’] &iscustomreport= items(‘Apply_to_each_on_XYZ_report_to_run’)? [‘iscustomreport’] &CRM_Filter= outputs(‘CRM_Filter’) &reporttypecode=items(‘Apply_to_each_on_XYZ_report_to_run’)? [‘reporttypecode’]
- Apply to each (Loop):
This step runs for each report records retrieved in the previous step.
- Run XYZ Report:
This step sends a POST request to a reporting system (/CRMReports/…) to run a specific report (e.g., “XYZ report”).
The request includes parameters like the report ID, custom report name, and type, dynamically populated from earlier steps.
Step 5: Generate PDF
- Configure the PDF conversion settings based on your requirements.


Step 6: Download and Save the PDF
- After generating the PDF, add an action to download it.
- Specify the file name and destination to ensure easy access later.

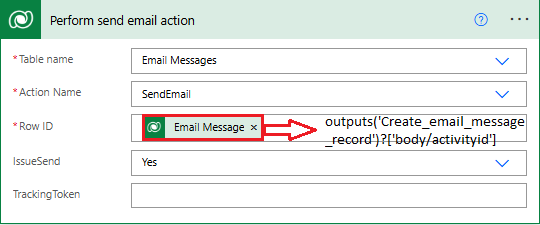
Step 7: Create an email record
Create an email record to make an email record in CRM

Add a step to attach the pdf with an email
Here we made an email record in CRM as we need to attach the PDF file to the email.
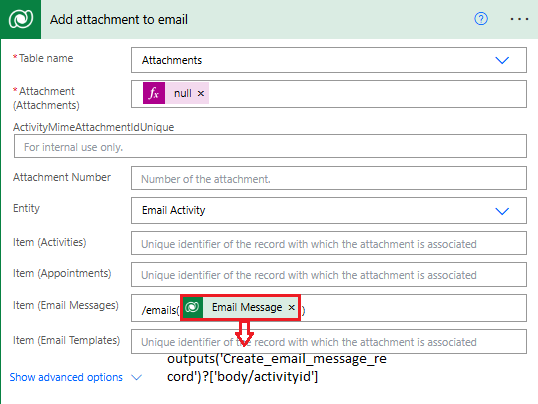
To send an email to outlook one must add the step” Perform bound action”.
Also one must check that the mailbox of the user triggering the flow is configured as without mailbox configuration the mail won’t be sent
Step 8: Test Your Flow
Once your flow is set up, it’s crucial to test it. Trigger the flow and verify that the PDF is created and saved correctly. Make any necessary adjustments to ensure smooth operation.