Sorting, Filtering & Searching features of PowerApps
WebSiteAdmin, March 8, 201942057 Views
This blog is intended to explore a quick idea on the basic operations like sorting, filtering and searching of data in PowerApps.
Please know: In all the below examples, we are taking D365 CRM tables as the data source.
SORTING
In PowerApps, we can view the records in a particular sequence using the Sort or SortByColumns functions. Let’s learn using them with small examples:
Sort
Syntax: Sort(source, expression, order)
- source: Give the name of the data source on which the sorting is to be done.
- expression: Give the criteria, based on which the sorting is to be done.
- order: Give the order in which the data is to be sorted. Acceptable values are Ascending or Descending.
Here, source and expression are mandatory, whereas order is Ascending by default.
Examples:-
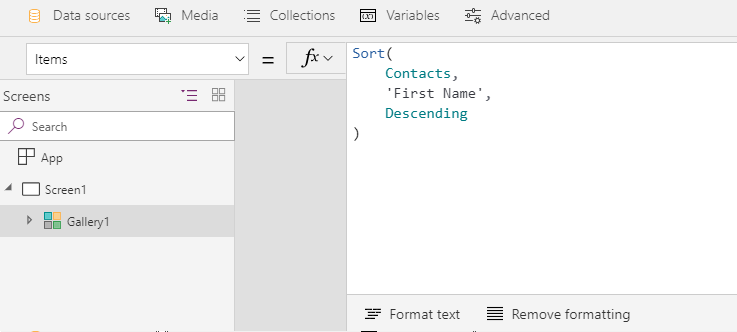
The formula shown in the below screenshot will sort the Contact entity records in the gallery by ‘First Name’ in descending order.
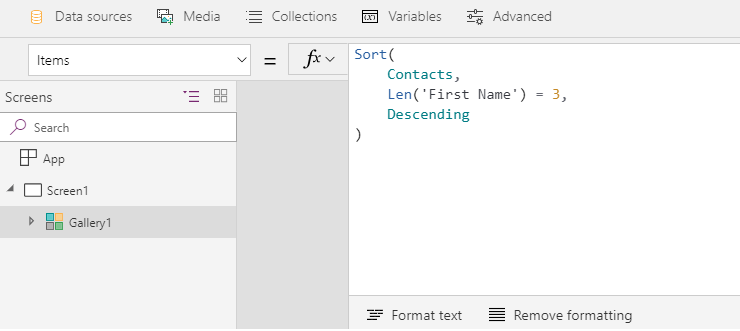
The formula shown in the below screenshot will bind the Contact entity records in the gallery having only 3 letters in their ‘First Name’ at the top followed by the other records.
SortByColumns
Syntax: SortByColumns(source, column, order)
- source: Give the name of the data source on which the sorting is to be done.
- Column: Give the name of the column by which the sorting is to be done.
- order: Give the order in which the data is to be sorted. Acceptable values are Ascending or Descending.
Here, source and Column are mandatory, whereas order is Ascending by default.
Example:-
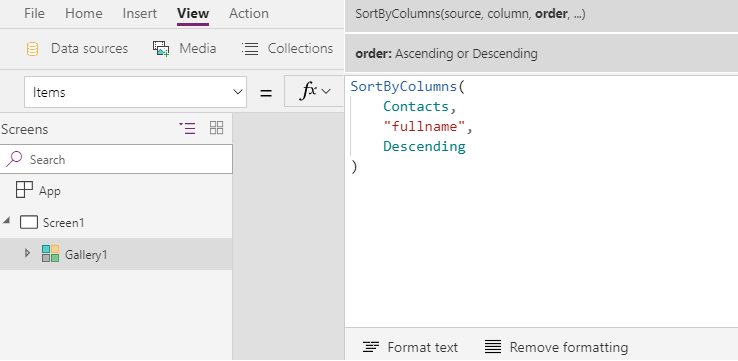
The formula shown in the below screenshot will bind the gallery with the Contact entity records sorted by the “fullname” in descending order.
FILTERING
We can make use of Filter function in the PowerApps to find the records in a table based on the specific criteria.
Syntax: Filter(source, logical_test(s))
- source: Give the name of the data source on which the filtering is to be done.
- logical_test: Give the condition based on which the filtering is to be done. We can also give multiple conditions here.
Examples:-
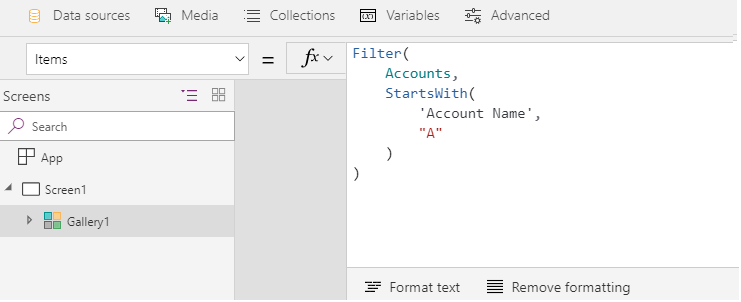
The formula shown in the below screenshot will bind the gallery with the Accounts having the Name beginning with the letter “A”.
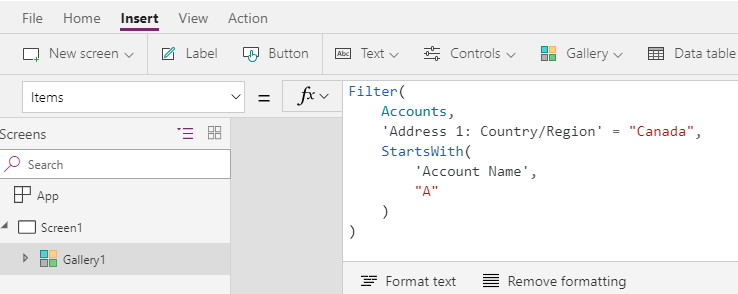
The formula shown in the below screenshot will bind the gallery with the Accounts having Country as “Canada” and the Name beginning with the letter “A”.
SEARCHING
Using the Search function, we can find the records in a table which contains the specified string in the given column(s).
Syntax: Search(source, text, column(s))
- source: Give the name of the data source on which the searching is to be done.
- text: Specify the text that is to be searched in the specified column(s) of the data source.
- Column: Specify the column(s) of the data source on which searching is to be done.
Example:-
The formula shown in the below screenshot will bind the gallery with the Accounts having the word “street” in their address1_line1 Or address1_line2 fields.

We can also make use of the combination of the above functions to get the desired data.
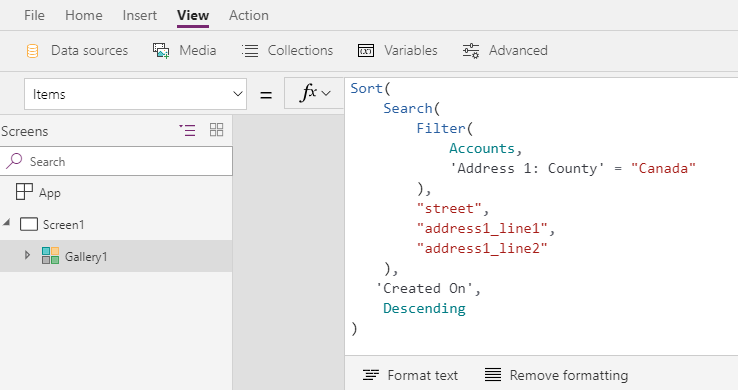
For example, in the below screenshot you can see that the gallery is bound with the Accounts having Country as “Canada” as well as having the word “street” in their address1_line1 or address1_line2 fields. And finally, the data is sorted in descending order of the “Created On” field of the Accounts.
In this manner, you can use the Sort, SortByColumns, Filter & Search functions in the PowerApp to get the data in the desired way.
I hope this helps you.
Insert data into Many-to-Many relationship in Dynamics CRM very easily & quickly, using the Drag and drop listbox.
http://www.inkeysolutions.com/what-we-do/dynamicscrmaddons/drag-and-drop-listbox
Comply your Lead, Contact, and User entities of D365 CRM with GDPR compliance using the GDPR add-on.
https://www.inkeysolutions.com/microsoft-dynamics-365/dynamicscrmaddons/gdpr
Create a personal / system view in Dynamics CRM with all the fields on the form/s which you select for a particular entity using the View Creator.
http://www.inkeysolutions.com/what-we-do/dynamicscrmaddons/view-creator


